Private nameservers (also called custom/own/personal nameservers) are the nameservers that use your own domain name, not your host domain names. For example instead of ns11.plothost.com and ns12.plothost.com you will use ns1.YOURDOMAIN.EXT and ns2.YOURDOMAIN.EXT.
The steps in configuring private nameservers:
1. Register your name servers at your domain registrar.
In this step, you will associate the private nameservers with the IPs used by your host for the nameservers. The best way to know what IPs to use is by asking your host. When you ordered the web hosting plan, you might receive the nameservers with their IPs. Example:
ns11.plothost.com   IP1
ns12.plothost.com   IP2
You will find the exact procedure of registering the custom nameservers on your domain registrar. Examples:
dynadot: https://www.dynadot.com/community/help/question/register-name-servers
google domains: https://support.google.com/domains/answer/3290309?hl=en
The idea is that you will associate
ns1.YOURDOMAIN.EXT IP1
ns2.YOURDOMAIN.EXT IP2
2. Change the nameservers at your domain registrar
Now that you have registered the private nameservers, go ahead and change the nameservers for the domain to the newly created ones.
3. Configure A records for the two nameservers on your web hosting control panel
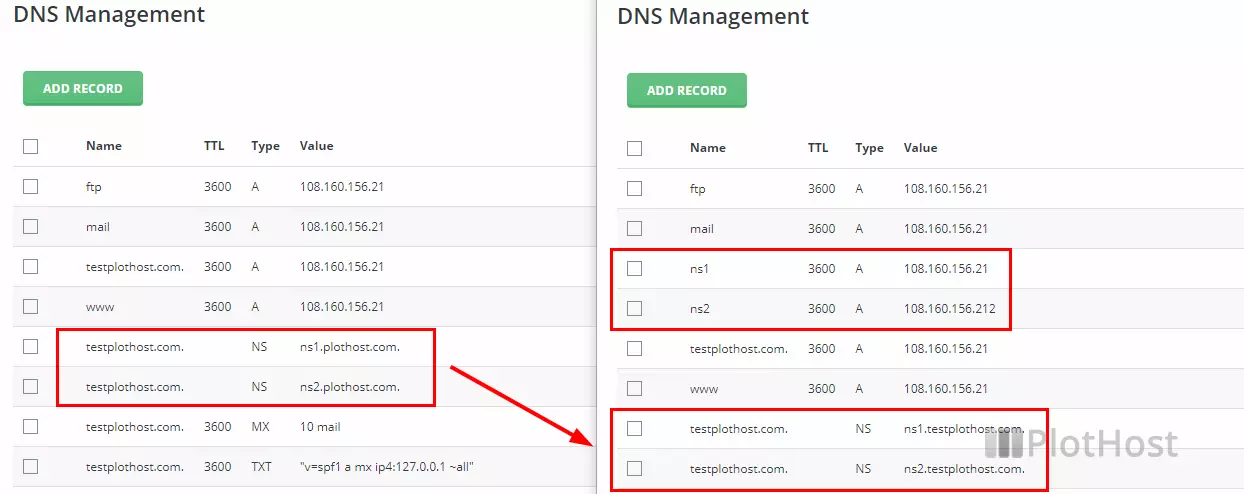
In your web hosting control panel – cPanel or DirectAdmin or Vesta etc. – go to the DNS Management section and add A records for the two nameservers.
ns1 A IP1
ns2 A IP2
Example for our testplothost.com domain. DNS entries before and after adding the ns1, ns2 A records:

4. Change the NS records in the DNS zone on your web hosting control panel
Change the two NS records in your DNS Management area as:
YOURDOMAIN.EXT   NS   ns1.YOURDOMAIN.EXT
YOURDOMAIN.EXT   NS   ns2.YOURDOMAIN.EXT